
1. Introduction to WP Mail SMTP
The WP Mail SMTP plugin is designed to solve email deliverability problems in WordPress. By default, WordPress uses the wp_mail() function to send emails, which often fails to authenticate properly and ends up in spam folders. WP Mail SMTP solves this by configuring WordPress to use a reliable SMTP service, ensuring better deliverability.
2. Why You Need WP Mail SMTP
Several factors make WP Mail SMTP a must-have plugin:
- Improved Email Deliverability: It ensures your emails are less likely to be marked as spam.
- Reliable Email Authentication: Using SMTP servers provides a secure and authenticated connection for sending emails.
- Debugging and Logging: You can review which emails are sent and troubleshoot problems easily.
3. Installing WP Mail SMTP
Installing WP Mail SMTP is as straightforward as any other WordPress plugin. Here’s how:
- Step 1: Log in to your WordPress dashboard.
- Step 2: Navigate to
Plugins > Add New. - Step 3: In the search bar, type “WP Mail SMTP” and look for the plugin developed by WPForms.
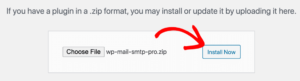
- Step 4: Click
Install Nowand thenActivate.
Once activated, a new menu item named WP Mail SMTP will appear in your WordPress dashboard.
4. Configuring WP Mail SMTP
After installing the plugin, you need to configure it to use your preferred email service. Follow these steps:
- Step 1: Navigate to
WP Mail SMTPin your WordPress dashboard. - Step 2: Click on
Settings. - Step 3: You will see multiple sections, including:
- From Email: Enter the email address you want to use to send all emails from your WordPress site. Ideally, this should be an email associated with your domain (e.g.,
noreply@yourdomain.com). - From Name: Enter the name you want your emails to appear from, like your company or website name.
- Mailer: Select the mailer service you plan to use, such as SMTP, Sendinblue, Mailgun, or Gmail.
- From Email: Enter the email address you want to use to send all emails from your WordPress site. Ideally, this should be an email associated with your domain (e.g.,
Setting the “From Email” and “From Name”
- From Email: Ensure you use a verified email address for your domain to increase deliverability.
- From Name: This is what recipients will see in their inbox. It can be your website name or a friendly name representing your brand.
5. Setting Up Different Mailer Options
WP Mail SMTP offers various options for mailers. Let’s review some popular ones:
5.1 Using SMTP
To configure the SMTP option:
- Select
Other SMTPfrom the list of available mailers. - You’ll need to input:
- SMTP Host: This is usually provided by your email provider (e.g.,
smtp.yourdomain.com). - SMTP Port: Commonly used ports are 465 for SSL and 587 for TLS.
- Encryption: Choose either SSL or TLS based on your email provider’s requirements.
- SMTP Username: Your email address used for authentication.
- SMTP Password: The password for your email account.
- SMTP Host: This is usually provided by your email provider (e.g.,
Note: Be sure to store your SMTP password securely. The plugin also provides options to store this data securely via your
wp-config.phpfile.
5.2 Using Gmail
If you prefer using Gmail, you’ll need to:
- Select
Gmailas your mailer. - Create a Google application and set up OAuth for your domain. Here’s a quick guide:
- Go to the Google Cloud Platform.
- Create a new project.
- Enable the
Gmail APIfor your project. - Set up OAuth credentials, including your authorized redirect URIs.
- Enter the Client ID and Client Secret in the WP Mail SMTP settings.
Tip: This option is ideal if you frequently use Gmail and want to ensure emails from your website are authenticated correctly.

5.3 Using Mailgun
Mailgun is a powerful service for developers and businesses looking for advanced email delivery options:
- Sign up for a Mailgun account and verify your domain.
- Add your domain and update DNS settings.
- Enter your Mailgun API Key and domain in the WP Mail SMTP settings.
5.4 Using Sendinblue
For those looking for a free option, Sendinblue is a solid choice:
- Sign up and verify your domain with Sendinblue.
- Obtain your API key from your Sendinblue account.
- Configure the plugin by pasting the API key and selecting Sendinblue as your mailer.
6. Testing Your Email Settings
Once you’ve configured WP Mail SMTP, it’s essential to test if your emails are sending correctly.
- Go to the
Email Testtab in WP Mail SMTP. - Enter an email address to send a test email.
- Check your inbox (or spam/junk folder) to ensure that the email was delivered successfully.
7. Troubleshooting Common Issues
Email delivery issues can arise even after proper configuration. Here are some troubleshooting tips:
- Check SMTP Details: Double-check the SMTP host, port, username, and password.
- Verify DNS Settings: If using a service like Mailgun or Sendinblue, ensure DNS settings are correctly configured.
- Plugin Conflicts: Sometimes, other plugins can interfere with WP Mail SMTP. Try deactivating other plugins to see if that resolves the issue.
- Hosting Restrictions: Some hosting providers block SMTP ports for security reasons. Check with your host if this might be the case.
8. Conclusion
The WP Mail SMTP plugin is a crucial tool for improving email deliverability on your WordPress site. With its simple setup and comprehensive options, you can ensure your website’s emails are authenticated and delivered reliably. By following this guide, you can set up and configure WP Mail SMTP to use a mailer that suits your needs.
Email deliverability doesn’t have to be a headache. With the right configuration, WP Mail SMTP can significantly improve the success rate of your outgoing messages, keeping your site functioning smoothly and your users informed.